My friend Brigitte (from the about.com quilt forum) posted recently about a free class that was coming up to learn crazy quilt embroidery. I signed up at the last minute and boy am I glad I did! Several other gals on the forum also joined, and 5 of us are VOS retreat attendees so in February we'll all bring our projects to have a mini show & tell.
I had purchased a number of spools of silk ribbon from Thread Art a few years ago with the intent of learning silk ribbon embroidery, but was discouraged by how difficult it was for me to pull the needle through the fabric with the ribbon. Luckily for me, Kathy's technique is more of a stab & pull (working front to back and then to the front again) instead of stitching from one side and this made a world of difference for me. I still need to take frequent breaks (I have chronic tendonitis or tendonosis in both hands/wrists), but it's quite manageable.
Class started less than 3 weeks ago and I'm already through all the tasks except for the last one, which involves adding beads, lace and other 3D elements. I'll share some pictures below of the various processes and tasks that were executed in the class.
If you'd like to watch Kathy's site to see when her next free classes will be held, it's shawkl.com
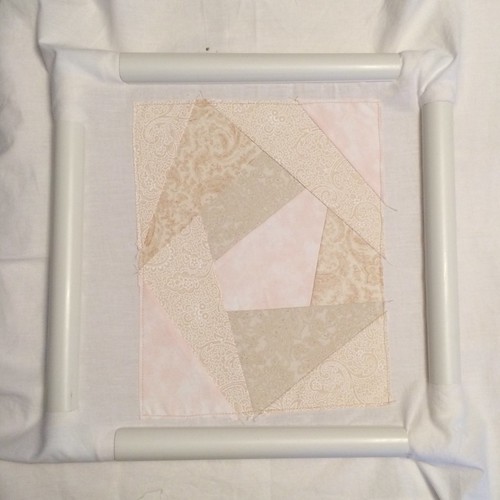
Here is my base block in the frame, ready to be adorned. Kathy provides templates that you print out and then punch holes in the designated places to make marks on the fabric. This helps you to learn even spacing to get nice results. The class is VERY structured, so be prepared to follow her directions carefully so you can learn her techniques. You must complete each task and post it to the (private) class blog before you receive the next task. Once the entire class is completed, you have the option to sign up for other free courses through her of an intermediate level. I can hardly wait!

These were the first few seams we sewed. You can see my pencil dots in some places that will later be covered with beads, french knots or other decorations. Click any of these images to go to my Flickr page for better detail.
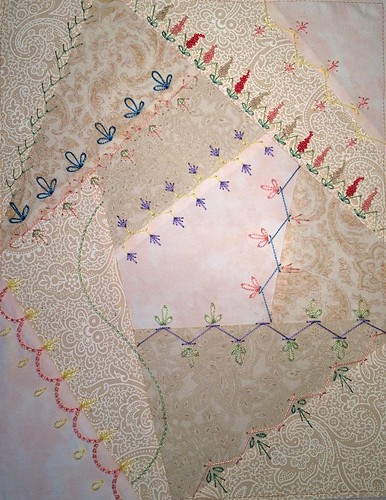
Here you see the rest of the seams have gotten their initial treatment. All of this so far is done with DMC perle cotton, mostly in size 8 but I also bought a few in size 12 as well. I was pleasantly surprised at how nice the perle was to work with, as I'd only used DMC floss previously. Kathy strongly recommended the perle and I'm so glad I listened. It has a very nice sheen and was really user friendly.
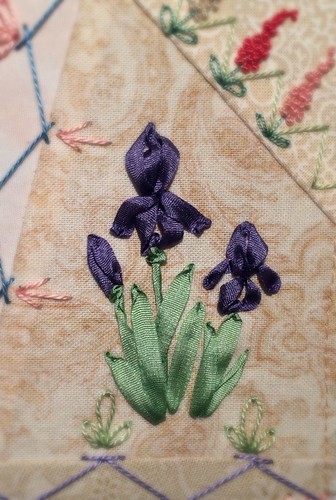
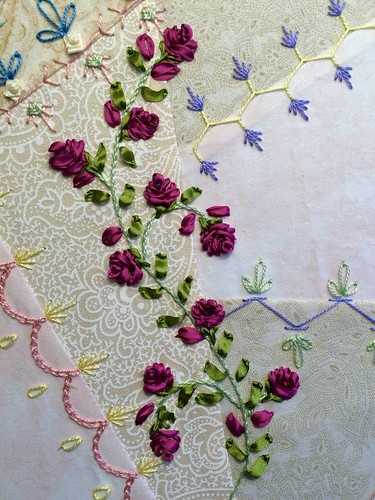
Now that the initial perle cotton work is done, it was time to play with those silk ribbons! Most of the work is in 4mm, including the iris. My test iris actually looked a little better than the finished one, but I'm still ok with this version too. The color looks much darker in photographs than it does in real life. It's actually a soft periwinkle color of YLI brand ribbon.
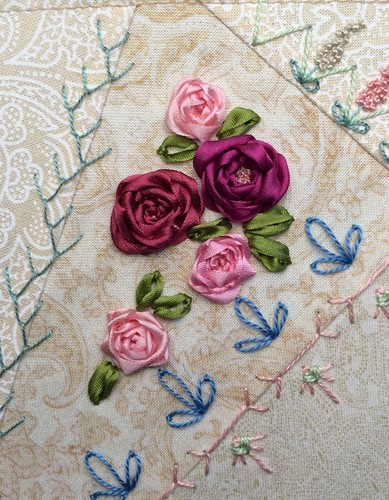
Here was the 2nd task using the ribbon. Here the darker roses are made with 7mm silk, some from Thread Art and some was some Bucilla I bought a million years ago. I will be adding more to this section soon, which is why it seems to be a little "open".
At the top of this post you saw the close up of the vine, which was the last seam we worked on. This is done with a french knot, and then a series of fly stitches under it to give it the appearance that you're viewing the rose from the side. The original instructions didn't include any buds, I added those myself. I also changed up the leaf pattern a bit. I had sketched something out at work earlier in the week (but accidentally made it a mirror image of the curve we'd drawn).
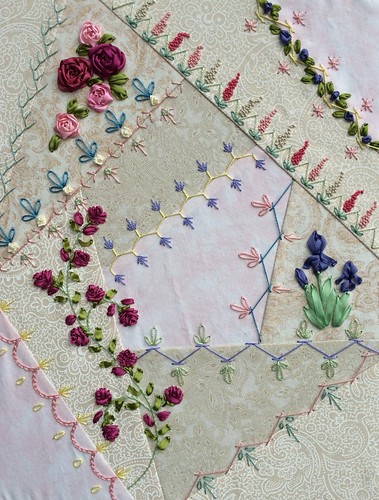
So here's what the entire block looks like at the time I'm writing this. On my way home today I stopped at Threadneedle Street in Issaquah and bought two more shades of green silk in 4mm (they didn't have any 2mm or 13mm unfortunately), and several more balls of perle cotton to play with on this and other future projects.
Hope you enjoyed my pictures, please let me know if you have any questions.